 From your friends at Stonebriar Home Inspections!
Many people look forward to the cooler weather. The brisk autumn winds and colorful leaves signal that once again it’s time to take out the sweaters and scarves. There are the hot soups and pumpkin-flavored drinks to keep one warm as the weather gets cooler, but for the conscientious homeowner and dedicated DIYer, it’s time to start winterizing your home.
Sealing out pesky drafts around your home helps save energy while also making your home more comfortable. It also prevents water damage from rain, ice or snow and blocks out pests that might be trying to find a warm place to spend the winter.
As you’re deciding where to get started, here are four projects that will go a long way to save you money and make your home ready for whatever Mother Nature throws at it this winter.
1. Create a thermal barrier.
The best way to keep your family warm and toasty while the wind, snow and sleet rage outside is to ensure your home and its building envelope — the thermal barrier between the interior of a home and the exterior environment — is properly sealed. How well the “shell” of the building (walls, roof, and foundation) is sealed against the exterior environment directly impacts the amount of energy required to maintain a comfortable indoor temperature. Maintaining a well-sealed building envelope means you’ll use less energy to heat and cool your home, saving you money. Take the time to check for and seal the following common air leaks around your home, both inside and out:
- Interior windows and doors: Slowly move a lit incense stick around the edges. If the smoke drifts to the side, it indicates an air leak that needs to be sealed.
- Interior baseboards and trim: Check for cracks and gaps where walls meet floors and ceilings.
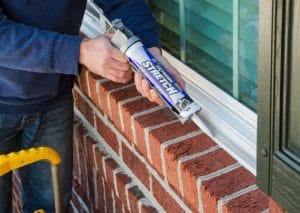
- Exterior windows and doors: Check for gaps and cracks where the frame meets the wall. Replace cracked or missing sealant around frames with an exterior grade sealant.
- Pipes and vents: If there is a gap between the pipe or vent and the surface it goes through, it needs to be sealed.
2. Seal air leaks.
Most cracks and gaps less than a half inch in width and depth can be filled with a sealant like DAP Extreme Stretch. Designed to stretch over 600 percent, Extreme Stretch can withstand the elements as your home expands and contracts, plus it is easy to apply on virtually any interior and exterior surfaces such as windows, trim, pipes, vents, and siding. It will not crack or lose adhesion, saving you money and preventing nasty drafts. And remember, before you apply, make sure to remove any old sealant that remains to ensure the new sealant can adhere properly.
3. Move beyond window wrap.
We all know that a traditional way to seal in the heat and keep out the cold is to insulate your windows with plastic film. This is an unsightly solution and leaves your home looking shrink-wrapped. A more effective and less obtrusive method is to use DAP SEAL ‘N PEEL, a temporary, removable weatherstrip caulk that’s great for sealing up windows for the season. It applies easily like a caulk around windows, doors, attic hatches, pipes and vents to keep out drafts. Once spring comes, it easily peels off to let in the fresh air.
4. Seal off a room.
If you live in a large house and have a room or two that you don’t use, consider sealing it up for the winter. Simply turn off the heating vent or radiator in the room to avoid paying to heat a room you aren’t using. Then use a door draft stopper or decorative long pillow along the door floor to prevent any drafts.
Whether you like the cold weather or not, the coming winter is a great opportunity to check up on your home and prepare it for winter. For the novice or the die-hard DIYer, it’s an important time to assess and address your home’s defenses against winter weather. – (BPT)


